At work we’re developing apps that are being used in developing countries and half of the office works out of Vancouver where our networks are very good. Unfortunately, this means that we often don’t think about user experience problems and bugs that occur only when the app is operating with a poor quality connection.
To combat this, we are taking motivation from Facebook, which offers “2G Tuesdays” to employees so they can experience what it’s like for people in other parts of the world. Facebook also released a tool call [Augmented Traffic Control](https://engineering.fb.com/2015/03/23/production-engineering/augmented-traffic-control-a-tool-to-simulate-network-conditions/) which allows you to simulate these types of conditions with your own equipment.
At our office, we’d like to have a dedicated device that provides this – and I had an old netgear R7000 router at home. Here’s a bit of a guide on how to get everything up and running.
First, flash dd-wrt onto the router. Detailed instructions here: [https://dd-wrt.com/wiki/index.php/DD-WRT_on_R7000](https://dd-wrt.com/wiki/index.php/DD-WRT_on_R7000) – basically take the r7000 file from here: [http://www.desipro.de/ddwrt-ren/K3-AC-Arm/Initial/](http://www.desipro.de/ddwrt-ren/K3-AC-Arm/Initial/) and upload it to the router using the update tool in the stock Netgear web tool.
SSH into the router. Username will be root and the password will be whatever you set your user password to in the router web interface.
Next, update the firmware:
`ddup --flash-latest`
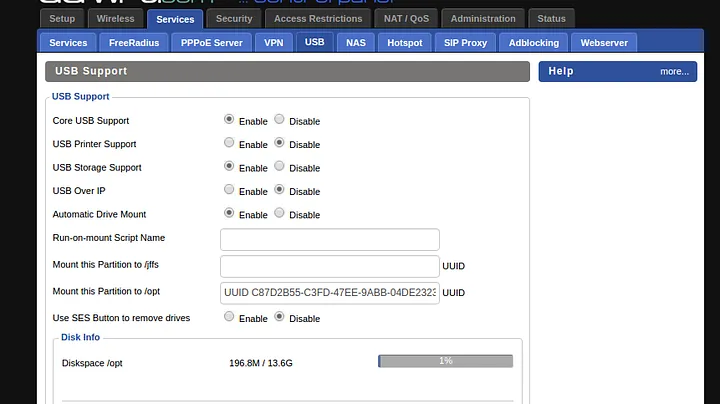
Enable usb storage:
I formatted the usb stick so that the entire thing is filled with a ext3 partition first (although you could add a swap partition if you wanted too).

(note: you may need to automount it first without putting the uuid in for opt and then refresh the page so it shows the uuid for the partition) – then fill it in save the page, unplug and replug the usb stick and probably refresh the page.
Next, we need a package manager to install all of the extra software we’ll need. First I tried optware, but it wouldn’t work when I tried to install the python tools because there were certificates installed. So next I tried entware which worked much better: [https://gist.github.com/dreamcat4/6e58639288c1a1716b85](https://gist.github.com/dreamcat4/6e58639288c1a1716b85).
```
cd /tmp
wget http://qnapware.zyxmon.org/binaries-armv7/installer/entware_install_arm.sh
chmod +x entware_install_arm.sh
./entware_install_arm.sh
```
You should be able to run the `opkg` command now (the package manager). Try running:
```
opkg update
```
If you have no errors we are good to install the other packages.
```
opkg install ca-certificates python-base python-crypto python-logging nano
```
I installed the easy_setup tools for python separately but I think you can do it through the pip installer. If you want to do it like I did:
```
curl https://bootstrap.pypa.io/ez_setup.py -k > ez_setup.py
python ez_setup.py
```
And now we want to get the pip python package manager:
```
curl https://bootstrap.pypa.io/get-pip.py -k > get-pip.py
python get-pip.py
```
And finally all of the stuff required by the Augmented Traffic Control:
```
pip install atc_thrift atcd django-atc-api django-atc-demo-ui django-atc-profile-storage
```
Make a directory for the django project:
```
mkdir /opt/var/django
cd /opt/var/django
django-admin startproject atcui
cd atcui
```
Open atcui/settings.py and enable the ATC apps by adding to INSTALLED_APPS:
```
INSTALLED_APPS = (
# Django ATC API
'rest_framework',
'atc_api',
# Django ATC Demo UI
'bootstrap_themes',
'django_static_jquery',
'atc_demo_ui',
# Django ATC Profile Storage
'atc_profile_storage',
)
```
Now, open atcui/urls.py and enable routing to the ATC apps by adding the routes to urlpatterns:
```
urlpatterns = [
url(r'^api/v1/', include('atc_api.urls')),
url(r'^atc_demo_ui/', include('atc_demo_ui.urls')),
url(r'^api/v1/profiles/', include('atc_profile_storage.urls')),
url(r'^$', RedirectView.as_view(url='/atc_demo_ui/', permanent=False)),
]
```
Also it looks like the django-bootstrap-themes package is outdated and has an issue – see here for the fix:
[https://github.com/facebook/augmented-traffic-control/issues/216](https://github.com/facebook/augmented-traffic-control/issues/216)
The file to modify will be found in `/opt/lib/python2.7/site-packages/atc_demo_ui/templates/atc_demo_ui`
You probably want to test that everything is working (follow the guide from the atcd git / wiki).
In order to enable all devices to be forced into using the shaping – I setup a nocatsplash redirect to the webui for the atcd: `http://192.168.1.1:8000/atc_demo_ui/`
Then to make atcd and the ui start on boot, I added the startup commands to a startup.sh script and put it into `/opt/startup`:
```
#!/bin/sh
atcd --atcd-wan vlan2 --atcd-lan br0 --atcd-mode unsecure --atcd-iptables /usr/sbin/iptables --daemon
nohup python /opt/var/django/atcui/manage.py runserver 0.0.0.0:8000 &
```
and then used the ddwrt web interface to set it as a startup script so it runs on boot every time.